Set Up Cloudflare Tunnel on Linux for Secure Remote Access to Your Apps
You want to access your self-hosted apps or services from anywhere, but you don’t want to mess with port forwarding, deal with firewalls, or expose your home network to the internet.
You just want a simple, secure way to make your local app publicly available, without breaking things or worrying about security.
If that sounds like you, you’re in the right place.
📑 Table of Contents
- 📘 Introduction
- 🌩️ What Is Cloudflare, and Why Use a Tunnel?
- 🌐 Before We Touch the Server: Get a Domain & Set Up Cloudflare
- 💾 Set Up Cloudflared on Your Linux Server
- 🌍 Connect Your Tunnel to a Subdomain in Cloudflare
- ✅ Final Thoughts
📘 Introduction
Self-hosting is awesome, but getting remote access securely can be one of the most frustrating parts, especially if you’re new to it.
Maybe you’ve got something like a Ghost blog, a media-server, or a dashboard running on your home server, and now you're thinking:
“It works great locally, but how do I access this when I’m not at home?”
Sure, you could open ports on your router or try to set up a reverse proxy with SSL certificates, but for a lot of people, that’s just too complicated or risky.
That’s where Cloudflare Tunnel comes in.
It’s a free tool that lets you securely expose any service running on your home network to the internet without opening any ports. It handles the routing, encryption (SSL), and DNS for you, and it works even behind CGNAT or dynamic IPs.
In this guide, I’ll show you how to set up a Cloudflare Tunnel using a self-hosted Ghost blog as the example, but the same steps will work for just about any local app or web service.
🌩️ What Is Cloudflare, and Why Use a Tunnel?
Before we get into the setup, let’s take a moment to understand what Cloudflare is, and why their tunnel feature is so useful for home servers and self-hosted apps.
What is Cloudflare?
Cloudflare acts as an intelligent middle layer between your server and the public internet. It protects your site from malicious traffic, manages DNS, and improves speed and reliability by optimizing how data is delivered to your visitors.
What is a Cloudflare tunnel
Cloudflare Tunnel (previously known as Argo Tunnel or cloudflared) creates a secure, outbound connection from your server to Cloudflare’s network.
This tunnel allows you to make a service (like a blog, media-server, or app) available on the internet, without exposing your actual network or configuring your router.
Why use Cloudflare tunnel
Here’s why Cloudflare Tunnel is a great choice for self-hosted services:
- No Port Forwarding or Public IP Needed - You don’t need to open any ports on your router, set up dynamic DNS, or deal with firewalls. Your server makes an outbound connection to Cloudflare, keeping your home network private and secure.
- Built-In HTTPS - Cloudflare provides a free SSL certificate for your domain, automatically. Your site will be served over HTTPS without you needing to configure or renew certificates on your server.
- Simple Setup - You don’t need to be a networking expert. Cloudflare Tunnel can be set up with a few commands.
- Scalable - You can route multiple subdomains and apps through the same tunnel config, great for expanding your setup over time.
🌐 Before We Touch the Server: Get a Domain & Set Up Cloudflare
Before we dive into terminal commands and configuration files, let’s get everything ready in Cloudflare. This step is all about setting up your domain, DNS, and Cloudflare account, so your server can later connect securely through the tunnel.
Step 1: Get a Domain Name
To make your self-hosted app accessible from anywhere, you’ll need a domain like cloudboxhub.com. While you can use Cloudflare Tunnel without one, a custom domain makes things cleaner — especially when setting up HTTPS.
💡 I personally recommend Dynadot. It’s beginner-friendly, affordable, and reliable. I use it for this blog, and all screenshots in this guide will be based on Dynadot, which might make things easier to follow.
Choose something short, relevant, and easy to remember.
Step 2: Create a Free Cloudflare Account
Go to cloudflare.com and create a free account.
Once you’re logged in, go to the Account Home tab and click "Add a Domain". Enter your domain name and follow the prompts to continue.
Step 3: Change Your Nameservers
On the next step, select "Quick Scan DNS Records." Cloudflare will scan your current DNS settings and display what it found. You can skip editing for now, just click Continue.
Next, Cloudflare will show you two nameservers to use.
Now head back to your domain registrar (in this case, Dynadot), check the box next to your domain, click the “Action” button, and choose “DNS Settings.” Then enter the Cloudflare-provided nameservers like in the screenshot below:
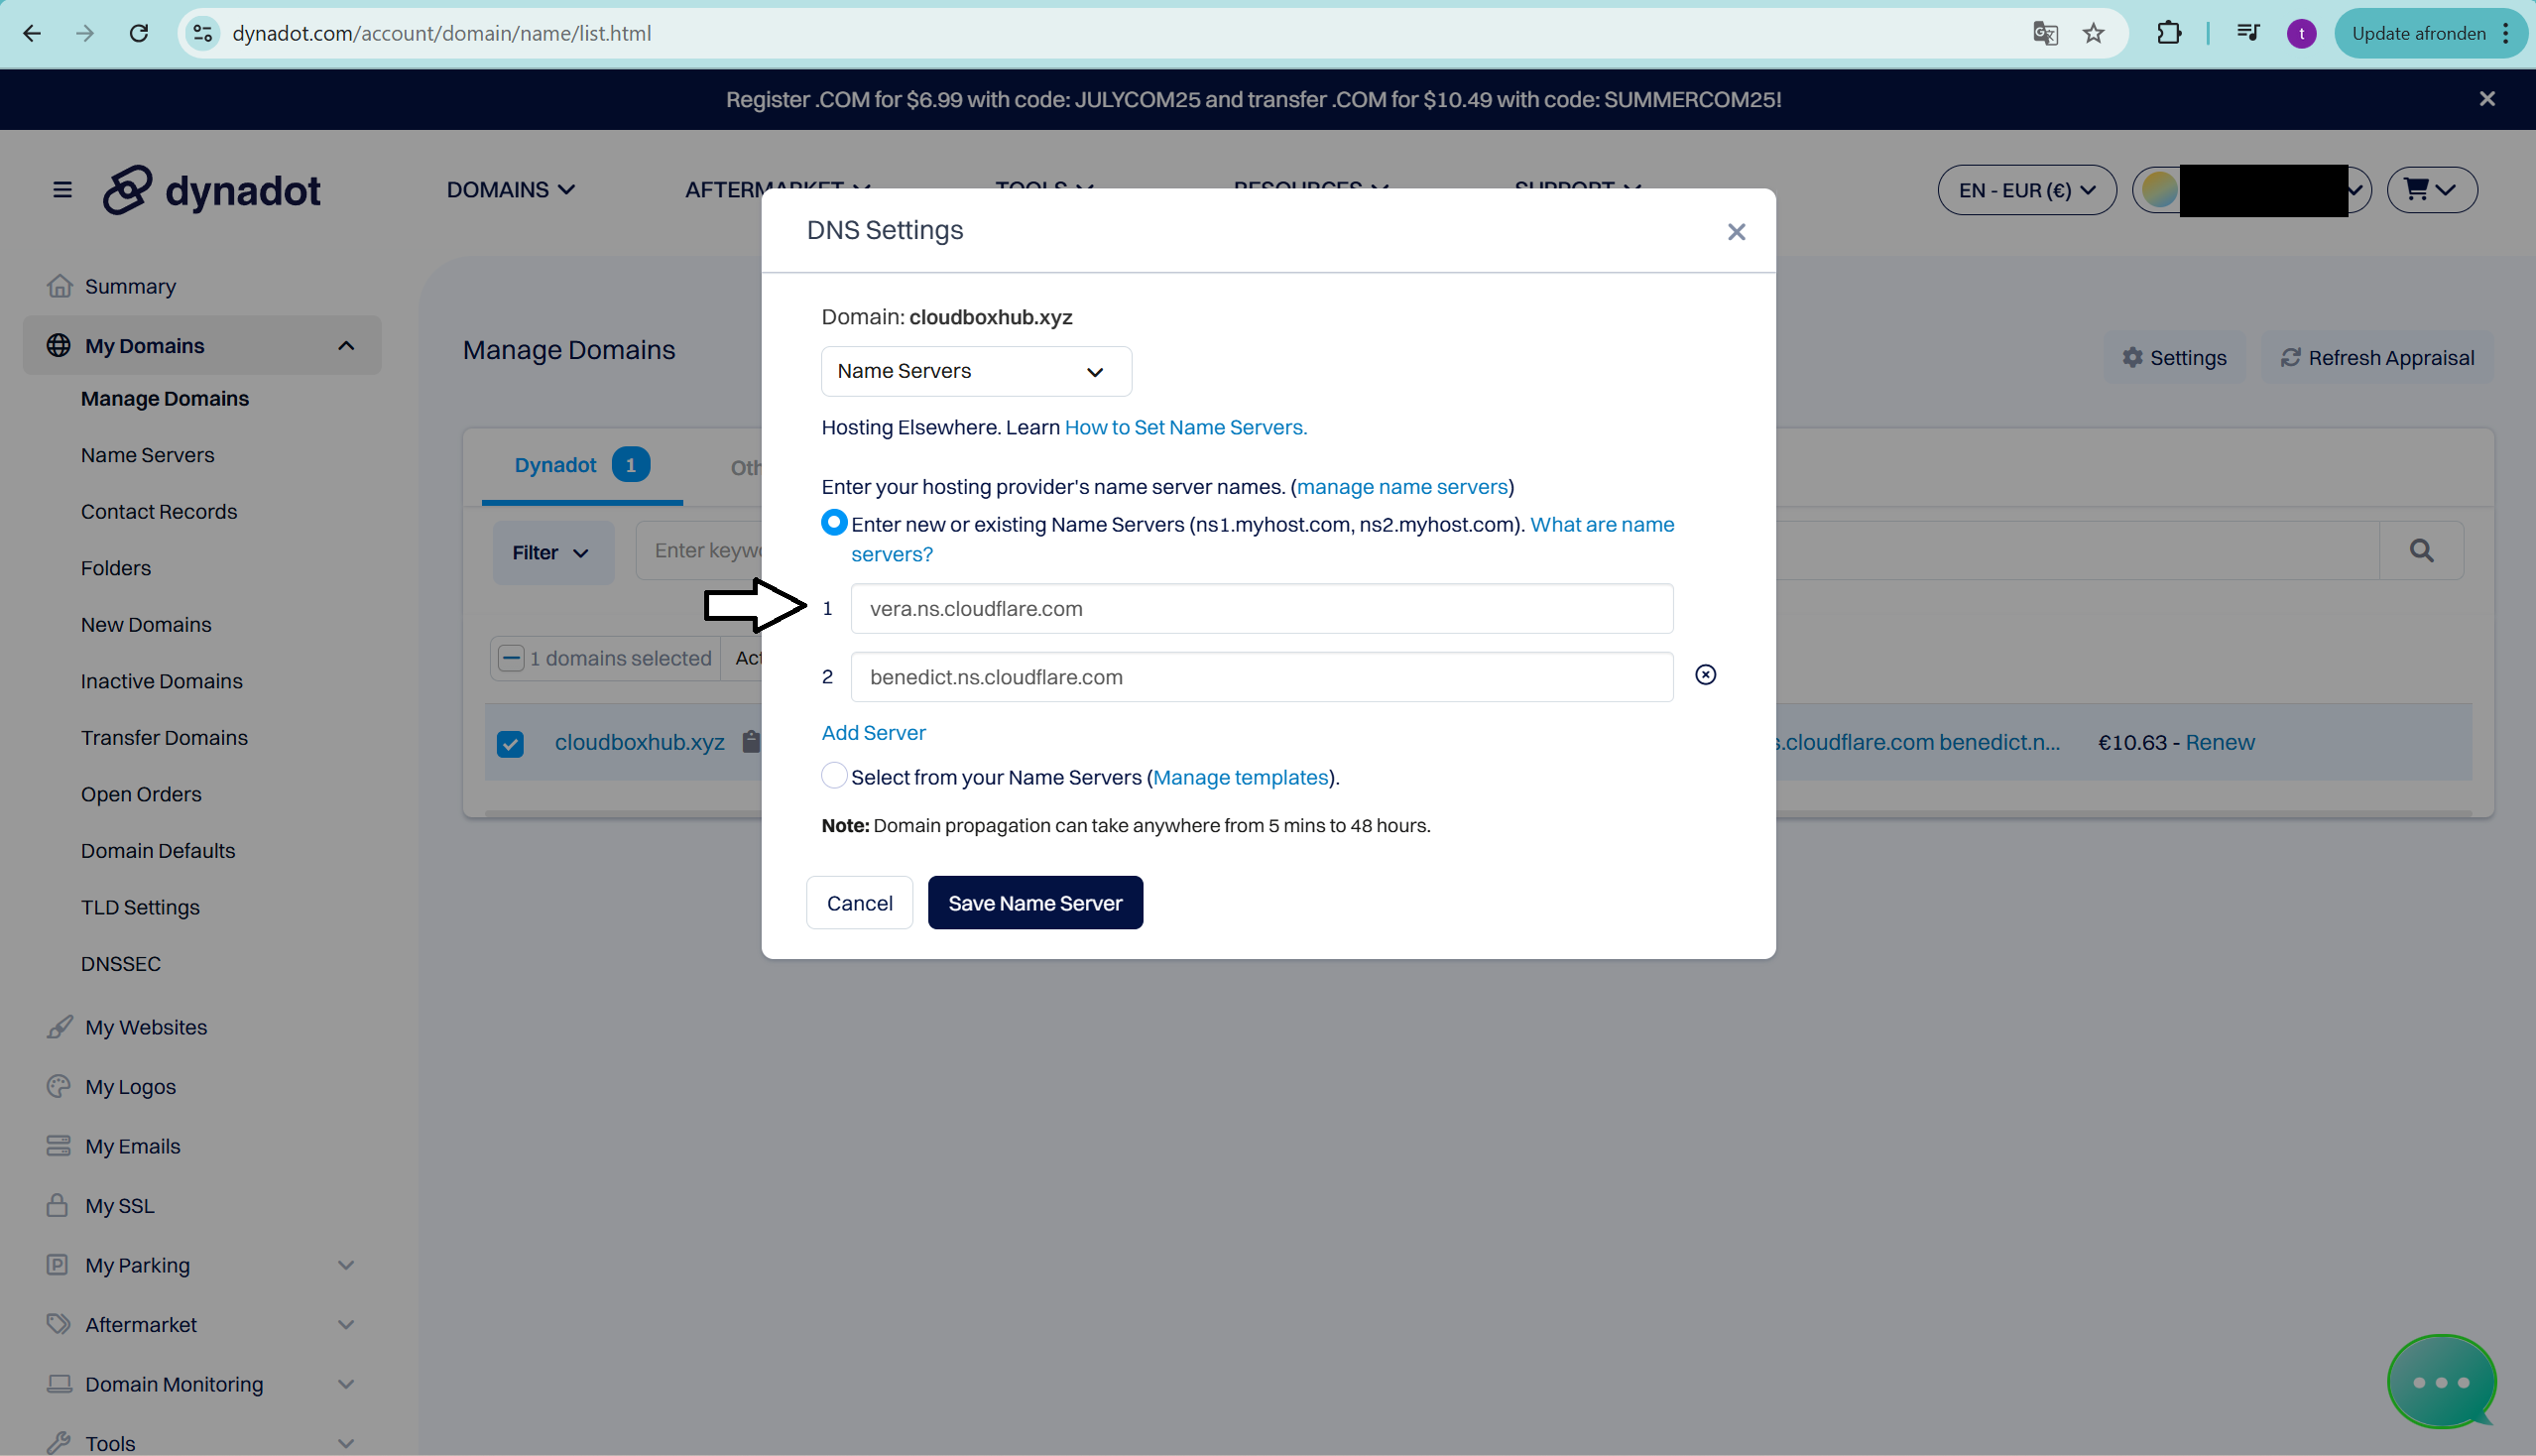
⏳ It may take a few minutes (up to 24 hours) for DNS changes to fully propagate. Cloudflare will notify you once your domain is connected and active.
Now that your Cloudflare account is set up and your domain is connected, we can move over to the server.
We’ll create the subdomain and DNS record after the tunnel is created, since we’ll need the unique tunnel address from Cloudflare at that point.
💾 Set Up Cloudflared on Your Linux Server
Now that your domain is connected to Cloudflare, it’s time to set up the tunnel from your linux server. We’ll use a small tool called cloudflared to create a secure, outbound connection to Cloudflare’s network.
This allows you to expose local apps without opening any ports or touching your router.
Step 1: Install Cloudflared
On Debian or Ubuntu, you can install Cloudflared with the official package:
curl -fsSL https://github.com/cloudflare/cloudflared/releases/latest/download/cloudflared-linux-amd64.deb -o cloudflared.deb
sudo dpkg -i cloudflared.deb
Step 2: Authenticate Cloudflared
Run this command to connect your server to your Cloudflare account:
cloudflared tunnel login
It will open a browser window. Log into your Cloudflare account and select the domain you added earlier (e.g. cloudboxhub.com).
If you're using something like PuTTY or a remote terminal, pressing Ctrl+C might cancel the login.
Instead, highlight the full URL to copy it, then use Ctrl+Shift+C to copy safely.
After approving, Cloudflared will store a credentials file in:
~/.cloudflared/
The dot (.) at the start makes this a hidden folder. You won’t see it with
lsunless you runls -a.
Step 3: Create a Tunnel
Now create a named tunnel:
cloudflared tunnel create myghostblog
This creates:
- A new tunnel ID
- A credentials file linked to this tunnel
- An entry in your Cloudflare dashboard
You can name it anything you want — myghostblog, ghost-tunnel, media-tunnel etc.
Step 4: Create a Config File
Next, create a config file so Cloudflared knows what to connect:
sudo nano /etc/cloudflared/config.yml
Paste in the following (adjust as needed):
tunnel: myghostblog
credentials-file: /home/yourusername/.cloudflared/<your-tunnel-ID>.json

ingress:
  - hostname: blog.cloudboxhub.xyz
    service: http://localhost:2368
  - service: http_status:404
🔁 Replace:
yourusernamewith your Linux username<your-tunnel-ID>with the actual filename inside ~/.cloudflared/blog.cloudboxhub.xyzwith your actual subdomain2368with the port used by your Docker container or app
Step 5: Run the Tunnel as a Service
To make the tunnel start automatically on boot:
sudo cloudflared service install
Then start the tunnel:
sudo systemctl enable cloudflared
sudo systemctl start cloudflared
Check the status:
sudo systemctl status cloudflared
This should show that the cloudflared service up and running:
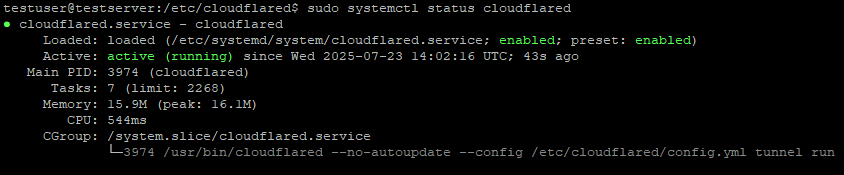
If everything is set up properly, your tunnel is now running in the background!
Alternative: You can also run the tunnel manually using:
cloudflared tunnel run myghostblogHowever, this only works while your terminal session is open. For long-term or production use, I strongly recommend using the systemd service instead.
🌍 Connect Your Tunnel to a Subdomain in Cloudflare
Now that your tunnel is up and running on your server, let’s make it accessible from the internet by pointing your domain (or subdomain) to it.
We’ll do this by creating a CNAME DNS record in your Cloudflare dashboard that maps your chosen subdomain (like blog.cloudboxhub.xyz) to the Cloudflare tunnel.
Step 1: Get Your Tunnel’s Public Address
Run this command to get your tunnel’s unique hostname:
cloudflared tunnel list
You'll see output like this:

The ID you see is your Tunnel ID (don’t confuse it with the Connector ID). To get your public tunnel address, just append .cfargotunnel.com to that ID:
For example:
80f75045-1c5f-42e0-a665-15711669e934.cfargotunnel.com
This is your tunnel’s public Cloudflare endpoint, it's how Cloudflare routes traffic to your linux server through the tunnel you created. This will be the target for your DNS record in the next step.
Step 2: Create a CNAME Record in Cloudflare
- Go to your Cloudflare dashboard
- Select your domain (e.g. cloudboxhub.xyz)
- Navigate to the DNS tab → Records
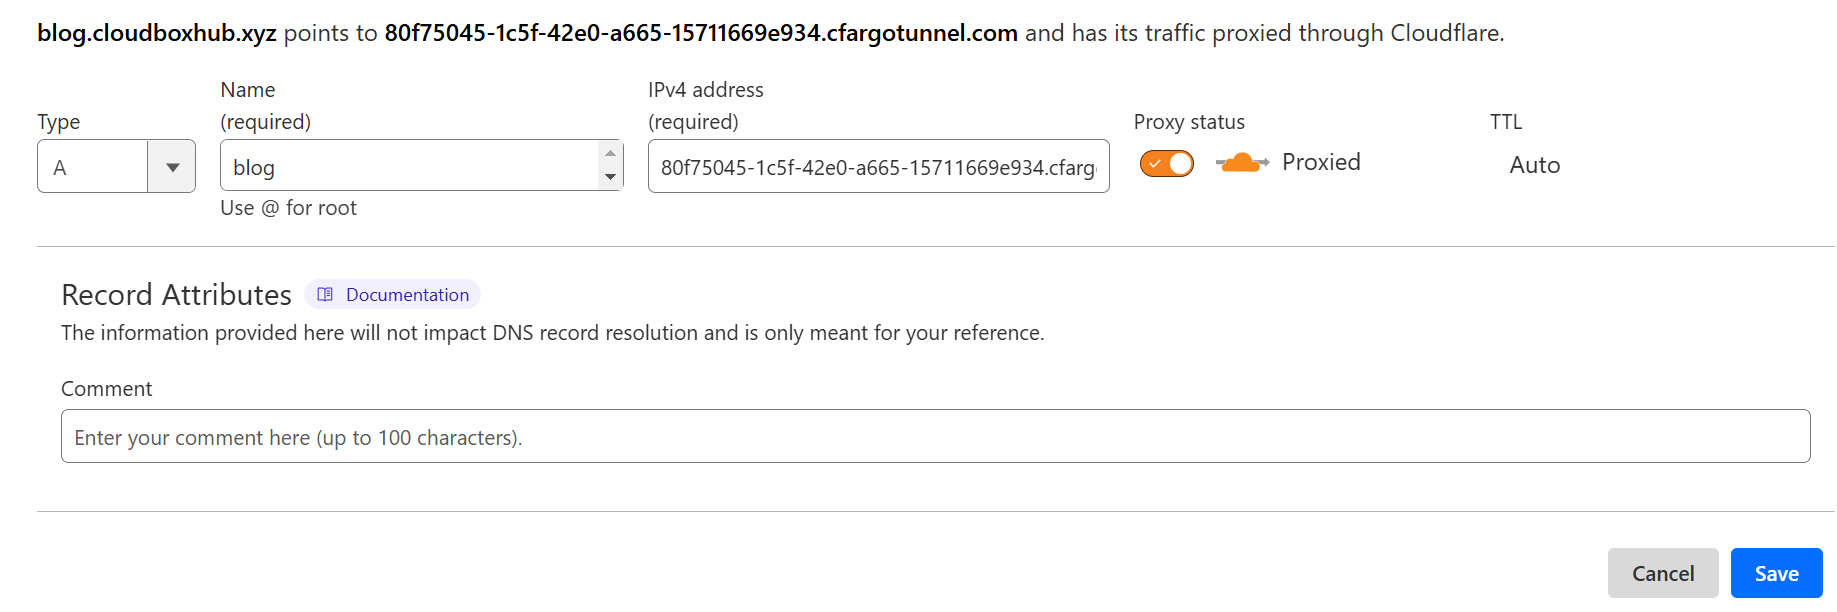
- Click “Add Record” and fill in:
| Field | Value |
|---|---|
| Type | CNAME |
| Name | blog (or whatever subdomain you want) |
| Target | your-tunnel-id.cfargotunnel.com (from step 1) |
| Proxy status | ☁️ Proxied (enabled) |
| TTL | Auto |
Then click Save.
Enabling “Proxied” ensures Cloudflare handles traffic securely, including HTTPS.
Done!
Your subdomain (e.g. blog.cloudboxhub.xyz) now points to your tunnel, and Cloudflare is handling the traffic securely and without exposing your local network.
You can now visit your domain and access your self-hosted app from anywhere!
Verify It’s Working
Open your domain in any browser.
If everything is set up correctly, your self-hosted app should load right away, securely, and without any port forwarding.
If it doesn’t load:
- Double-check that your subdomain in Cloudflare matches the one in your tunnel config file
- Make sure the app you’re tunneling (like Ghost) is running and listening on the correct internal port
✅ Final Thoughts
Congrats! You just set up a secure, public-facing tunnel from your home server to the internet using Cloudflare Tunnel!
You did it without opening a single port, messing with firewalls, or worrying about dynamic IPs. That’s a huge win for privacy, security, and simplicity — especially for home lab users.
Whether you’re self-hosting Ghost, a dashboard, or any other app, this tunnel is your gateway to making it accessible from anywhere, the safe way.
👉 Ready to self-host a blog? Check out How to Self-Host a Ghost Blog with Docker Compose on Linux
👉 Looking for a starter home server build? Best Budget Home Server to Start Self-Hosting