How to Self-Host Umami Analytics on a Linux Server with Docker
Looking for a simple, privacy-respecting way to see how many people visit your self-hosted site, without relying on Google Analytics?
Let me show you how I set up Umami, a lightweight, open-source analytics tool, on my own Linux server using Docker.
📑 Table of Contents
- 📘 Introduction
- 🤔 Why Choose Umami?
- 🛠️ Prerequisites
- 📦 Step 1: Set Up Umami with Docker Compose
- 🚀 Step 2: Start Umami and Log In
- 🌐 Step 3: Make Umami Publicly Accessible
- 📎 Step 4: Add the Tracking Script to Your Website
- 🏁 Final Thoughts
📘 Introduction
If you run a personal blog or small project, you might still want to know how people are finding your site, what content gets the most views, or where your readers are coming from.
The problem? Most analytics tools (like Google Analytics) are overkill for small sites, and they come with serious privacy trade-offs.
That’s why I went looking for something lightweight, simple to self-host, and focused on user privacy.
🤔 Why Choose Umami?
There are a few popular privacy-first analytics tools out there: Umami, Plausible, Matomo, GoatCounter, and of course, Google Analytics.
Here’s why I chose Umami for my site:
- Open source and developer-friendly — you can host it yourself, customize it, and dig into the code if needed. It’s under the MIT license.
- Clean and minimalist UI — I personally love how simple and focused it is. Just the stats that matter, no clutter.
- No cookies or tracking consent banners required — it’s GDPR-compliant by default.
- Self-hosted - your data stays on your server, not Google’s.
- Multi-site support — track multiple blogs or apps from one dashboard.
- Easy to deploy — especially with Docker Compose (which I’ll show you below).
- Public dashboards — optionally share stats without giving away admin access.
Compared to Google Analytics:
- No personal data is sent to third-party servers.
- No creepy fingerprinting or invasive tracking.
- No legal grey areas — Google Analytics has been ruled illegal in several EU countries due to privacy concerns and data transfers to the U.S.
- No bloated dashboards or complex setup.
If you're a developer, blogger, or just want more control over your analytics, Umami is a simple, private, and transparent solution that you actually own.
🛠️ Prerequisites
Before we start setting up Umami, make sure you have the following:
✅ Required
- A Linux server (VPS or home server — anything that can run Docker)
- Docker and Docker Compose already installed
- Terminal access to your server (SSH or local)
🌐 Optional (But Recommended)
- A domain name (I personally recommend Dynadot if you still need one.)
- Cloudflare Tunnel or another reverse proxy for HTTPS access
I wrote a separate guide on this if you're interested
If you want to track a public site or app (like a blog or portfolio), Umami needs to be reachable from the internet, your visitors' browsers need to load the tracking script from your Umami server.
That’s why I recommend assigning it a subdomain and exposing it securely with something like Cloudflare Tunnel. It keeps your server private while still allowing the tracker to work globally.
📦 Step 1: Set Up Umami with Docker Compose
To run Umami on your server, we'll use Docker Compose. This makes it easy to spin up both Umami and its PostgreSQL database with one command.
Start by creating a new directory for your setup:
mkdir umami
cd umami
Now, create a file named docker-compose.yml:
nano docker-compose.yml
Paste the following:
version: "3.8"

services:
  umami:
    image: ghcr.io/umami-software/umami:postgresql-latest
    container_name: umami
    ports:
      - "3000:3000"
    environment:
      DATABASE_URL: postgresql://umami:umami@db:5432/umami
      HASH_SALT: your-random-hash-salt-here
      APP_SECRET: your-random-app-secret-here
    depends_on:
      - db
    restart: unless-stopped

  db:
    image: postgres:15
    container_name: umami-db
    environment:
      POSTGRES_DB: umami
      POSTGRES_USER: umami
      POSTGRES_PASSWORD: umami
    volumes:
      - umami-db-data:/var/lib/postgresql/data
    restart: unless-stopped

volumes:
  umami-db-data:
The database name, user, and password can stay as umami, just make sure they match in the DATABASE_URL.
About HASH_SALT and APP_SECRET
These two values are used by Umami to securely handle login passwords and session tokens.
HASH_SALTmakes password hashes harder to reverse-engineer if your database were ever exposed.APP_SECRETis used to sign login sessions (JWT tokens) so they can’t be tampered with.
You don’t have to generate them in any specific way, but for simplicity and security, I recommend generating strong random strings like this:
openssl rand -base64 32
Then copy and paste the output directly into the docker-compose.yml file where you see your-random-hash-salt-here and your-random-app-secret-here.
Optional: Use a .env File Instead
If you prefer to keep secrets out of your Compose file (recommended if you’re using version control), you can put them in a .env file like this:
HASH_SALT=your-random-hash-salt
APP_SECRET=your-random-app-secret
Then update your Compose file to include:
env_file:
  - .env
Either approach will work, choose what fits your setup best.
🚀 Step 2: Start Umami and Log In
Now that your docker-compose.yml is ready and your secrets are in place, you can start Umami.
From the same folder where your docker-compose.yml is located, run:
docker compose up -d
This command tells Docker to pull the images (if not already downloaded), create the containers, and run everything in the background.
You can check if everything is running with:
docker compose ps
If it’s working, you should see both the umami and umami-db containers listed as “Up”.
Access the Umami Dashboard
Now open your browser and go to:
http://<your-server-ip>:3000
Or if you're on the same machine:
http://localhost:3000
You should see the Umami login screen.
Use the default credentials:
Username: admin
Password: umami
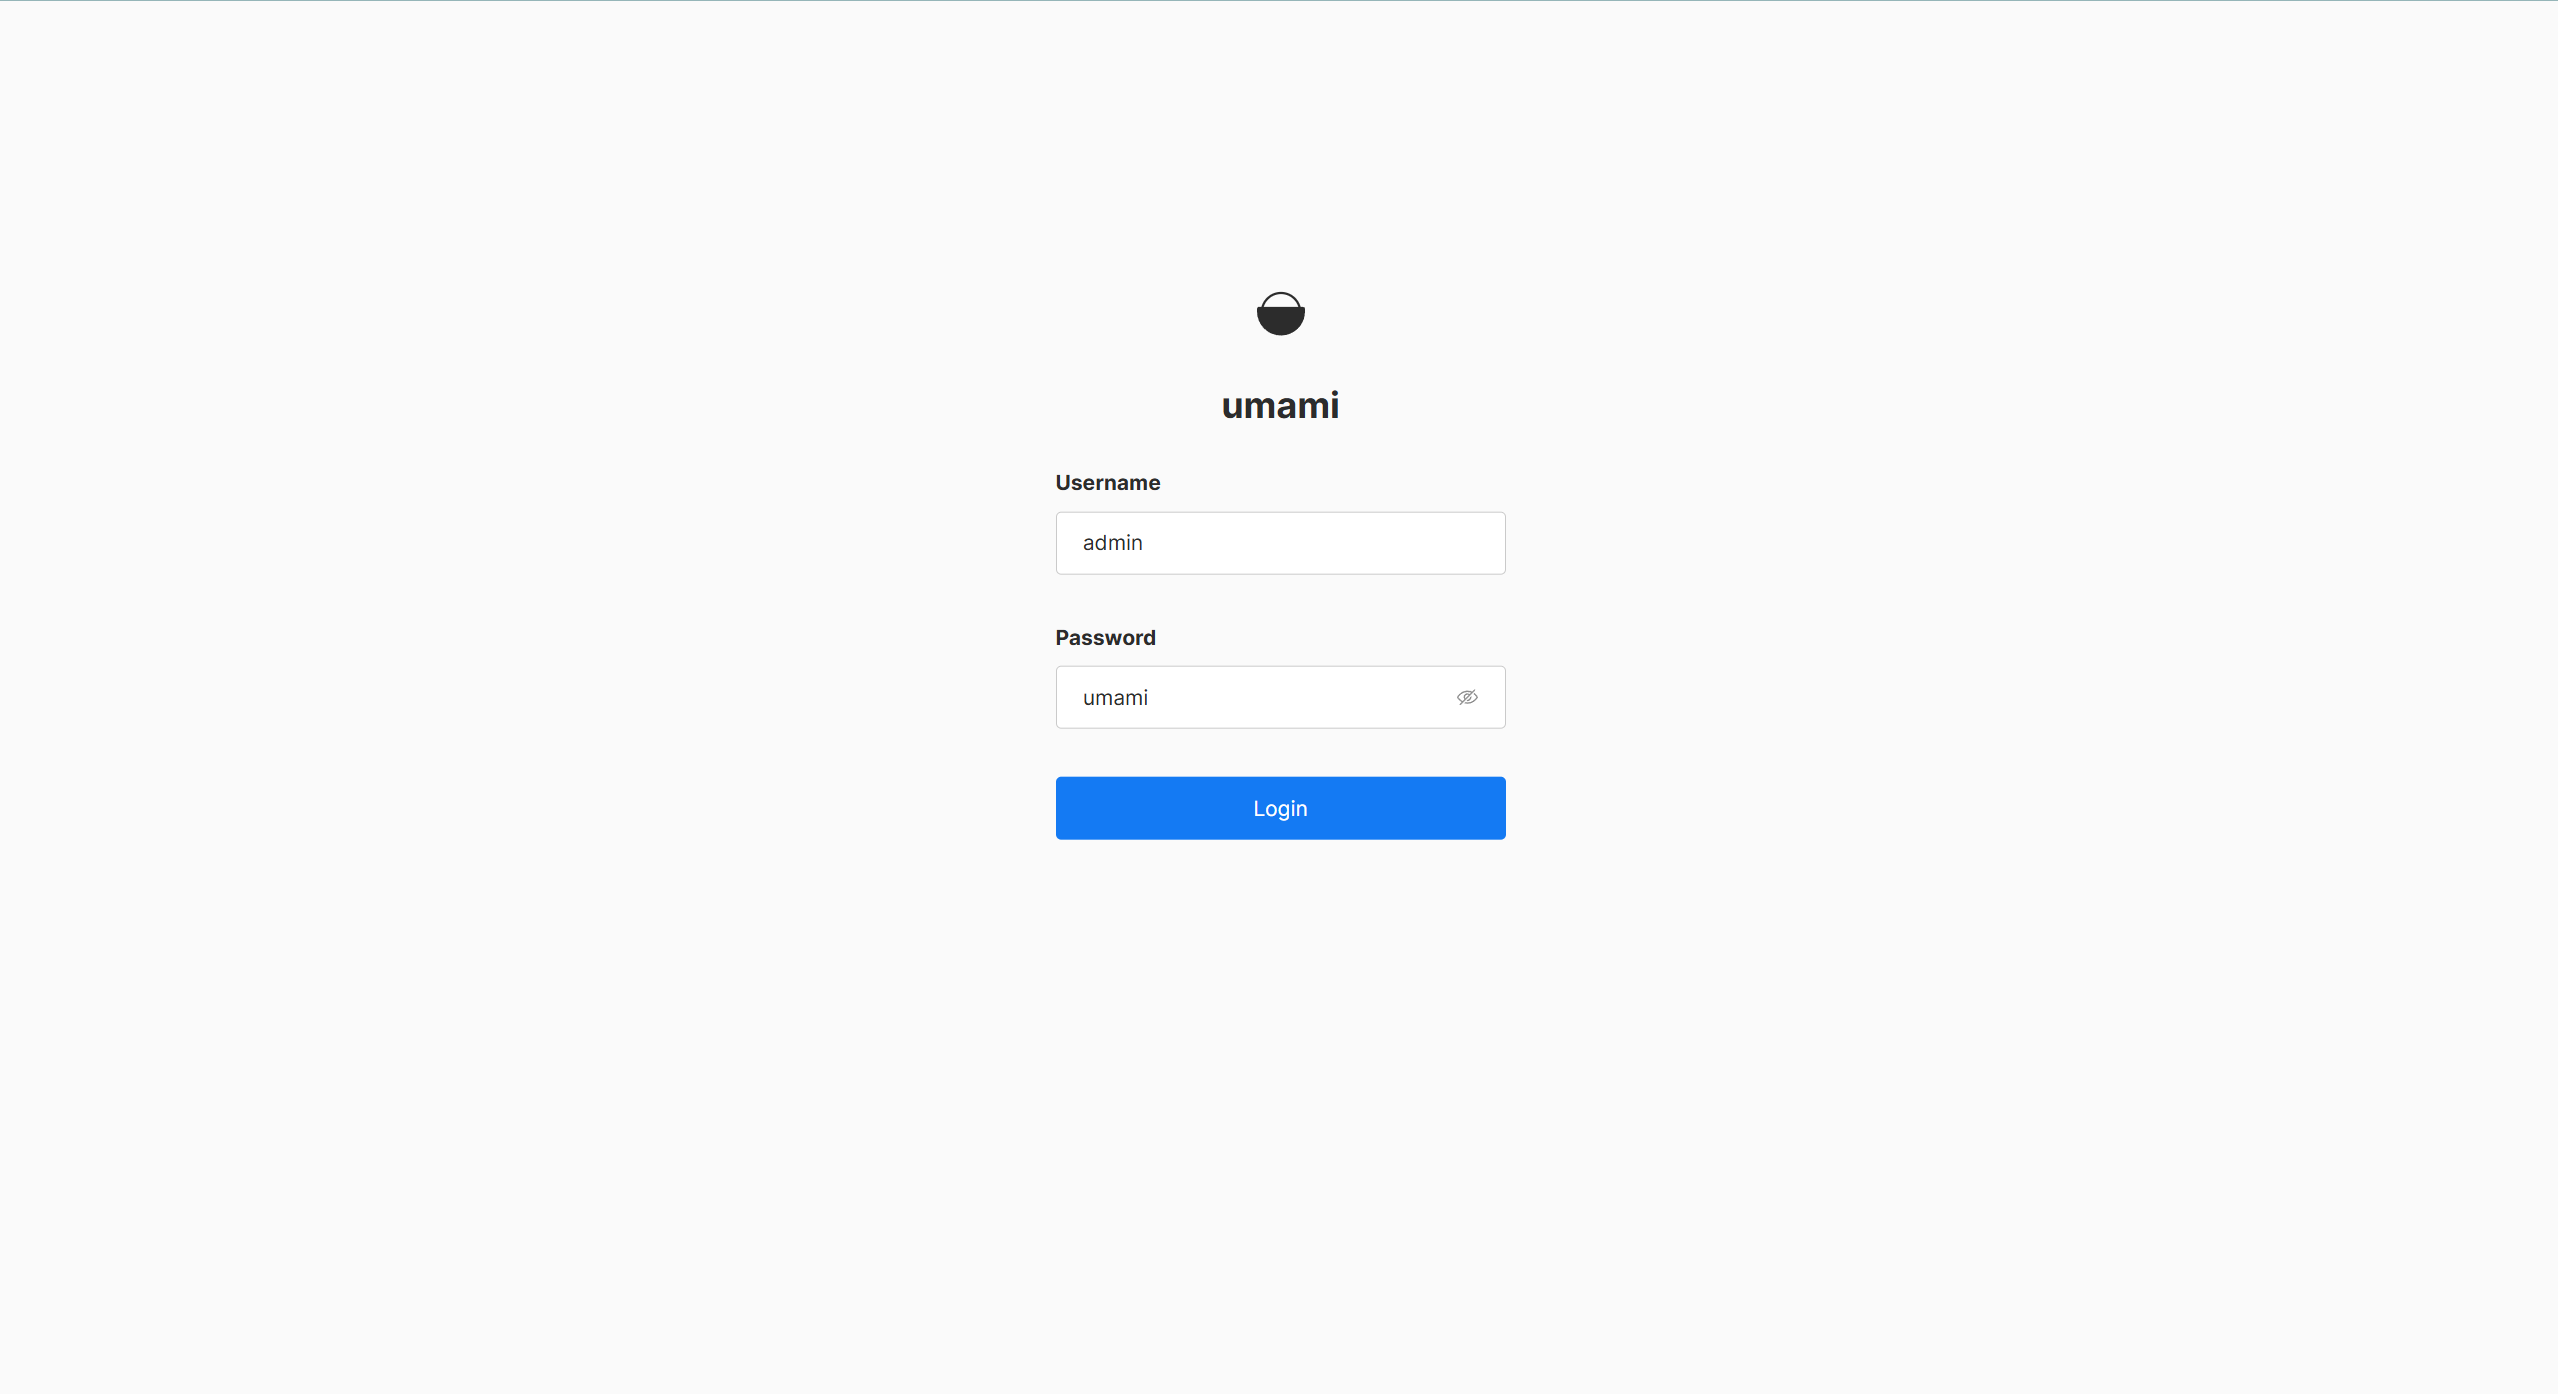
Immediately update your password from your profile in the top-right corner. Once you do, it's securely hashed using the HASH_SALT you provided earlier.
🌐 Step 3: Make Umami Publicly Accessible
If you want to track a public website, your Umami instance also needs to be reachable from the internet, so your site can load the tracking script.
The easiest way to do this securely is with Cloudflare Tunnel and a custom domain (like analytics.yoursite.com).
👉 Check out my separate guide on setting that up
📎 Step 4: Add the Tracking Script to Your Website
Now that Umami is running and publicly accessible, you can add its tracking script to any website you'd like to monitor.
1. Create a Site in Umami
First, log in to your Umami dashboard and:
- Go to the Settings tab.
- Click Websites
- Click "Add Website".
- Give your site a name (this is just for you).
- Enter the domain of the site you're tracking.
- Click "Save".
Under Edit -> Tracking code, Umami will give you a script that looks like this:
<script async defer data-website-id="your-website-id" src="https://your-domain.com/script.js"></script>
2. Add the Script to Your Site
Paste the tracking script just before the closing tag of your site’s HTML. Where this goes depends on how your site is built:
- Static site (HTML/CSS): Add it manually into each page or your HTML template.
- Custom site or app: Inject it in your main layout or base template.
- CMS (WordPress, Ghost, etc.): Use the theme settings, code injection tools, or custom header scripts.
Make sure to replace your-domain.com with your actual Umami domain (e.g. analytics.cloudboxhub.xyz), and your-website-id with the real ID from Umami.
Done!
Once the script is live, Umami will start collecting visitor data in real-time. You can refresh the dashboard and see stats appear as people visit your site, even if it’s just you testing.
If you don’t see any data after loading the page you're tracking, double-check:
- That the script is added correctly
- That your Umami instance is publicly accessible
- That the domain in Umami matches the site you're tracking
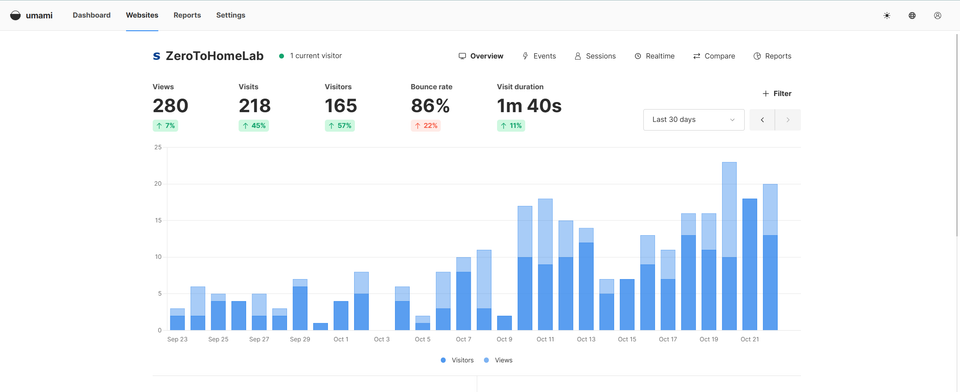
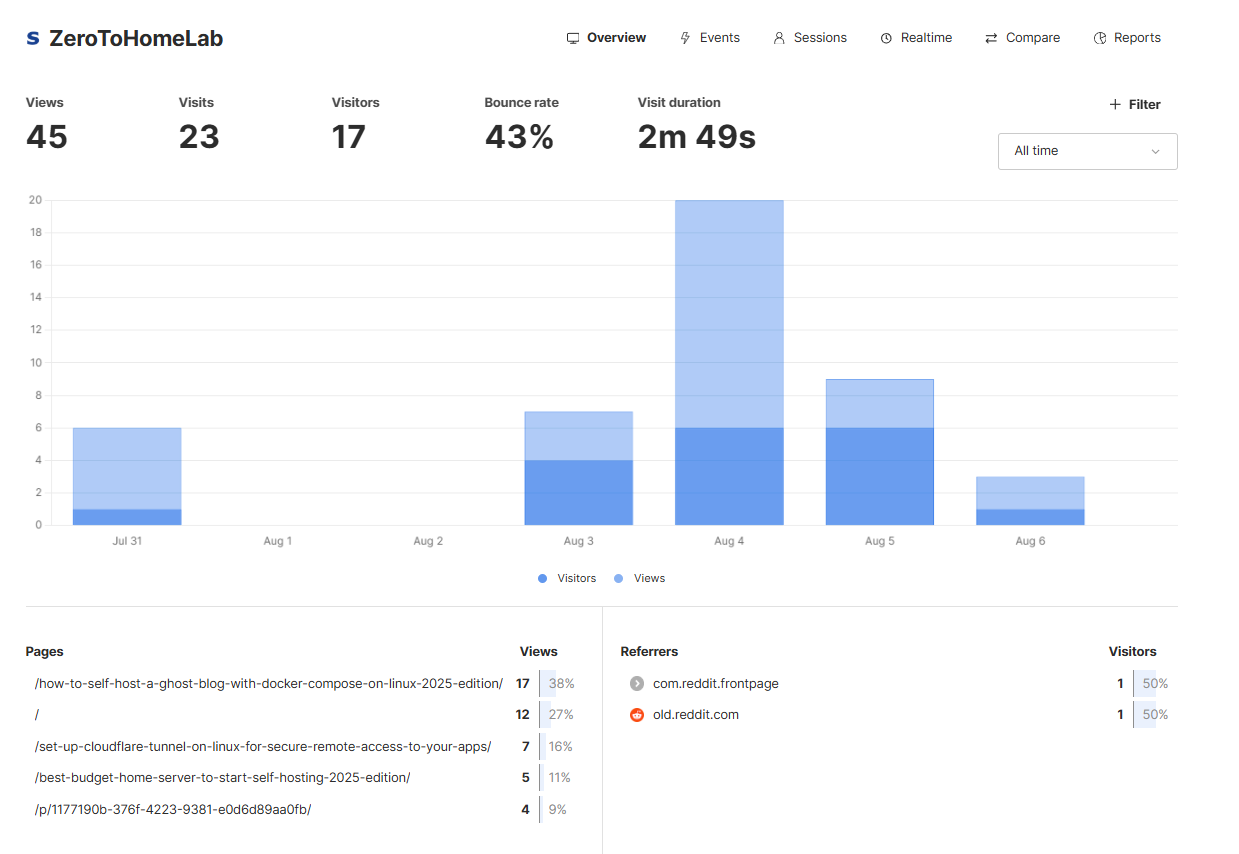
Everything should show up within seconds. Here’s what my Umami dashboard looks like once data starts coming in:
🏁 Final Thoughts
And that’s it! You now have a fully self-hosted, privacy-friendly analytics dashboard running on your own server.
Umami gives you just the data you need, page views, visitors, top content, without tracking or profiling your users. No cookies, no consent banners, no third-party scripts spying on your traffic.
This setup is great for blogs, portfolios, side projects, or anything else you want to track without giving up control.
Thanks for following along and feel free to share if this helped you!
👉 Ready to self-host a blog? Check out How to Self-Host a Ghost Blog with Docker Compose on Linux
👉 Curious what kind of hardware you can start with?
Check out my blog for a budget home server for self-hosting (2025 edition).