How I Set Up Network-Wide Ad Blocking with AdGuard Home and Docker on My Home server
If you care about privacy, faster browsing, and keeping your network clean from ads and trackers, this guide is for you.
I’ll walk you through how I installed AdGuard Home on my home server using Docker and turned it into a network-wide adblocker that works on every device in my home.
Although I’m running AdGuard Home on my home server, you don’t need a big setup to follow along, a Raspberry Pi works perfectly too.
It’s low-power, silent, and easily powerful enough to handle DNS for your whole household.
⚠️ Note: DNS-based ad blocking can’t block everything, for example, YouTube ads or some in-app ads still slip through.
For near-complete blocking, combine AdGuard Home with a browser extension like uBlock Origin or AdGuard Browser.
📑 Table of Contents
- 🤔 What Is AdGuard Home (and Why Use It?)
- 🐳 Installing AdGuard Home with Docker
- ⚙️ Setting Up AdGuard Home in the Web Interface
- 🌐 Configuring Your Router to Use AdGuard Home
- ✅ Final Thoughts
🤔 What Is AdGuard Home (and Why Use It?)
AdGuard Home is a self-hosted DNS server that blocks ads, trackers, and malicious domains for your entire network before they even reach your devices.
When a device (like your phone, laptop, or TV) tries to load an ad, it first asks the DNS server where to find it.
AdGuard intercepts that request and simply says:
“That address doesn’t exist.”
No connection, no ad. It’s that simple, and incredibly effective.
How It Works (In Simple Terms)
Normally, your devices talk to your internet provider’s DNS, which resolves every website address into an IP.
Instead of your devices and router sending every DNS request directly to an external provider like Google (8.8.8.8) or Cloudflare (1.1.1.1), they now send those requests to AdGuard Home inside your network.
That means AdGuard becomes the “middle layer”, it receives all DNS lookups first, filters out anything on your blocklists (ads, trackers, telemetry), and only then forwards the allowed requests to the real DNS servers on the internet.
This setup gives you complete visibility and control over what devices are querying, what’s being blocked, and which domains are allowed, all from a single dashboard.
That means AdGuard can:
- Block ads and tracking domains network-wide
- Filter adult or unsafe content (optional)
- Let you create custom blocklists or allowlists
- Give you a dashboard to see who and what is talking on your network
And the best part: once it’s set up, every device that connects to your Wi-Fi automatically benefits, no need to install anything.
🐳 Installing AdGuard Home with Docker
Running AdGuard Home in Docker keeps things simple, clean, and easy to maintain.
Here’s the docker-compose.yml file I use:
version: "3.8"

services:
  adguardhome:
    image: adguard/adguardhome:latest
    container_name: adguardhome
    restart: unless-stopped
    ports:
      - "53:53/tcp"      # DNS
      - "53:53/udp"      # DNS
      - "3000:3000/tcp"  # Initial setup UI
      - "80:80/tcp"      # Web UI after setup (you can change this)

    volumes:
      - ./config:/opt/adguardhome/conf
      - ./work:/opt/adguardhome/work
Save this as docker-compose.yml in your preferred project folder, for example:
/home/youruser/adguardhome/
Then start the container with:
docker compose up -d
You might get an error saying that port 53 is already in use, it means another service is already handling DNS on your system.
You can check which one with:
sudo lsof -i :53
On most Linux systems, this is usually a service called systemd-resolved.
If that’s the case, you can disable it with:
sudo systemctl stop systemd-resolved
sudo systemctl disable systemd-resolved
If you’re running Docker on another platform (like macOS, Windows, or a NAS), check your network settings for any built-in DNS service that might be reserving port 53 and disable it temporarily.
After that, restart your container, AdGuard Home should now start without any issues.
⚙️ Setting Up AdGuard Home in the Web Interface
Once the container is running, open your browser and go to:
http://YOUR_SERVER_IP:3000
You’ll be greeted by the AdGuard Home setup wizard.
Follow the steps to create an admin password and choose your upstream DNS servers (for example, Cloudflare or Quad9).
At Step 4 (“Configure your device”), select Router, this option is best for network-wide blocking, since you’ll point your router’s DNS to AdGuard later.
Default Configuration
After finishing the setup wizard, AdGuard Home will already have a basic configuration ready to go.
You can check it under Settings → DNS Settings.
You should see an upstream server like this:
https://dns10.quad9.net/dns-query
This means AdGuard is using DNS-over-HTTPS (DoH) with Quad9, a privacy-focused DNS provider that blocks malicious domains.
DoH encrypts your DNS queries, so your internet provider or others can’t easily see which websites you’re visiting, it’s a small but important privacy upgrade.
DNS Blocklists
Next, go to Filters → DNS Blocklists.
By default, you’ll likely see two main filters:
- AdGuard DNS Filter – a broad, well-maintained list that blocks most common ads, trackers, and analytics domains.
- AdAway Default Blocklist – originally made for Android, but still excellent at blocking mobile ad networks and telemetry.
You can enable both, they complement each other well and give a strong balance between privacy and usability.
AdGuard will automatically fetch updates for these lists, so you can “set it and forget it.”
🌐 Configuring Your Router to Use AdGuard Home
Now that AdGuard Home is running and configured, the next step is to route all your network’s DNS traffic through it.
That way, every device on your Wi-Fi: laptops, phones, smart TVs, even IoT devices, automatically benefits from ad and tracker blocking.
Step 1: Open Your Router’s DNS Settings
Log in to your router’s admin panel (usually something like 192.168.2.254 or 192.168.1.1) and look for a section called DNS, Internet Settings, or WAN Configuration.
Step 2: Set AdGuard Home as the Primary DNS
Replace the existing DNS addresses with your AdGuard Home server’s IP address.
For example:
| Type | Address | Description |
|---|---|---|
| Primary DNS (IPv4) | 192.168.1.10 |
Your AdGuard DNS server IPv4 |
| Secondary DNS (IPv4) | 9.9.9.9 |
Quad9 (fallback) |
| Primary DNS (IPv6) | 2001:db8:abcd:1234::10 |
Your AdGuard DNS server IPv6 |
| Secondary DNS (IPv6) | 2620:fe::9 |
Quad9 (fallback) |
Make sure your AdGuard Home instance is always online, otherwise devices will fall back to the secondary DNS.
Step 3: Save and Reconnect Devices
After saving the settings, reconnect one of your devices to Wi-Fi and verify that DNS requests are being filtered through AdGuard.
You can test this in two easy ways:
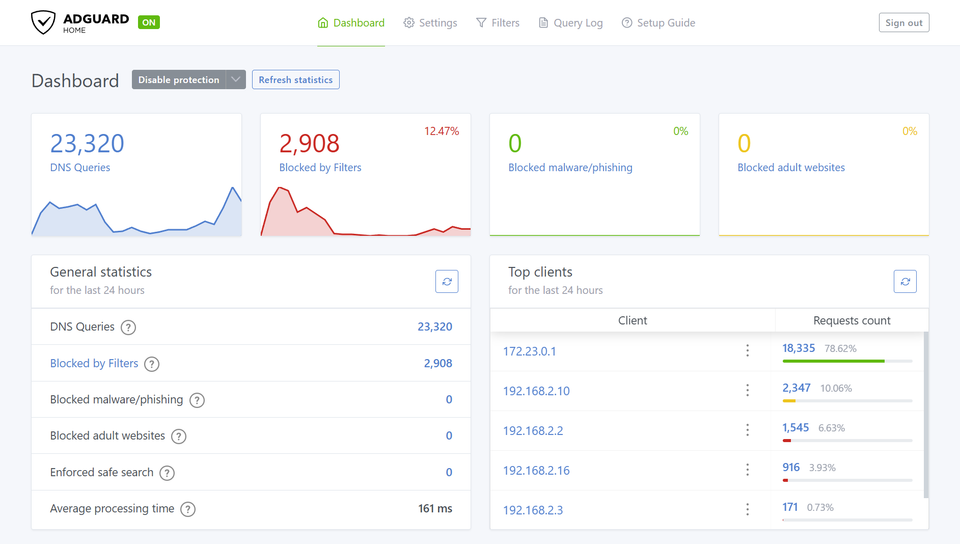
Option 1 — Using the Dashboard
Open the AdGuard Home dashboard → Query Log and refresh a webpage.
You should immediately see requests from your device appearing there.
Option 2 — Using a Terminal
Run:
nslookup example.com
If the “Server” field shows your AdGuard IP address either the ipv4 or ipv6 address, it’s working perfectly.
From now on, your AdGuard Home server acts as the central DNS for your entire network, quietly filtering ads and trackers for every connected device.
✅ Final Thoughts
Setting up AdGuard Home was one of those small projects that ended up having a big impact.
It’s easy to forget how much tracking happens in the background until you start blocking it, and suddenly pages load faster, smart TVs stop calling home every few seconds, and your network just feels cleaner.
For me, this project wasn’t just about blocking ads.
It was about taking back control over what happens inside my own network, and learning more about how DNS and privacy fit together behind the scenes.
AdGuard Home is a great example of why I enjoy self-hosting:
you get transparency, flexibility, and the satisfaction of running a service that directly improves your digital life.
Whether you run it on a full homelab server or a small Raspberry Pi, it’s a simple way to bring privacy and performance to every device in your home network, no subscriptions, no tracking, no middlemen.
Remember: DNS-level blocking is the first line of defense.
For full coverage, to also block youtube ads, combine it with a browser extension like uBlock Origin or AdGuard Browser.
I hope this guide helps you set up your own network-wide ad blocker!