How I Automated Cloudflare Cache Purging for My Self-Hosted Ghost Blog
In my previous Cloudflare performance article, I enabled HTML caching for my self-hosted Ghost blog. That made a big difference: pages were served much faster, and my server had to do a lot less work.
But there was one downside.
Because Cloudflare now caches the public HTML pages, new content does not always appear immediately. For example, when I publish a new Ghost post, the homepage can still show the old version until the cache expires.
Manually purging the Cloudflare cache works, but that is not really the point of self-hosting for me. If something is predictable and repeatable, I would rather automate it.
So in this article, I’ll show how I built a small Dockerized webhook service that listens for Ghost publish events and then purges the relevant Cloudflare cache automatically.
Table of Contents
- Why I Automated Cache Purging
- What You Need Beforehand
- Running the Cache Purger with Docker Compose
- Creating the Ghost Webhook
- Testing the Full Setup
- Final Thoughts
Why I Automated Cache Purging
HTML caching solved the performance problem, but it introduced a freshness problem.
After publishing a new Ghost post, Cloudflare can still serve the old cached homepage. The post is live, but visitors may not see it right away.
I did not want to manually purge the cache after every new post, so I automated it with a simple flow:
Ghost webhook → Node.js cache purger → Cloudflare API
When Ghost publishes a post, it sends a webhook to my cache purger container. The service verifies the request and then tells Cloudflare to purge the cached homepage.
Every site is a little different, so you need to decide which pages actually become stale after publishing new content.
For my Ghost setup, the homepage is the main one. A new post gets its own new URL, but the homepage is an existing page that changes every time I publish something.
What You Need Beforehand
Before building the webhook service, there are two Cloudflare values you need to have ready:
- a Cloudflare API token
- your Cloudflare Zone ID
Cloudflare API Token
The Node.js service needs permission to purge the Cloudflare cache. For that, I created a dedicated Cloudflare API token instead of using my global API key.
In Cloudflare, go to:
Manage Account → Account API Tokens → Create Token
When creating the token, add a policy with the Purge permission and create the token.
Later, this token will be passed to the Docker container as an environment variable:
CLOUDFLARE_API_TOKEN=your-cloudflare-api-token
Cloudflare Zone ID
The service also needs the Cloudflare Zone ID.
The Zone ID tells the Cloudflare API which domain it should purge the cache for.
You can find it by opening your domain in Cloudflare and going to:
Overview → API → Zone ID
This will also be passed to the container as an environment variable:
CLOUDFLARE_ZONE_ID=your-cloudflare-zone-id
Running the Cache Purger with Docker Compose
For the cache purger itself, I built a small Node.js service and packaged it as a Docker image.
The code is available on GitHub, and I also published the image on Docker Hub so it can be used directly in Docker Compose.
- GitHub: ghost-cloudflare-cache-purger
- Docker Hub: marink1999/ghost-cloudflare-cache-purger
The service has one simple job:
- receive a webhook from Ghost
- verify that the request is valid
- call the Cloudflare API
- purge the cached homepage
I added the container to my existing Docker Compose setup:
ghost-cache-purger:
  image: marink1999/ghost-cloudflare-cache-purger:latest
  ports:
    - "127.0.0.1:3001:3001"
  container_name: ghost-cache-purger
  environment:
    CLOUDFLARE_API_TOKEN: ${CLOUDFLARE_API_TOKEN}
    CLOUDFLARE_ZONE_ID: ${CLOUDFLARE_ZONE_ID}
    SITE_URL: ${SITE_URL}
    PURGE_PATH: ${PURGE_PATH}
    PORT: ${PORT}
    GHOST_WEBHOOK_SECRET: ${GHOST_WEBHOOK_SECRET}
  networks:
    default:
      aliases:
        - ghost-cache-purger.internal
  restart: unless-stopped
The environment variables are loaded from my .env file:
CLOUDFLARE_API_TOKEN=your-cloudflare-api-token
CLOUDFLARE_ZONE_ID=your-cloudflare-zone-id
SITE_URL=https://yourdomain.com
PURGE_PATH=/purge
PORT=3001
GHOST_WEBHOOK_SECRET=your-ghost-webhook-secret
The SITE_URL is used to build the homepage URL that should be purged. For example, if SITE_URL is:
SITE_URL=https://example.com
the service will purge:
https://example.com/
For this direct internal setup to work, the Ghost container and the cache purger container need to be on the same Docker network. In the next section, I will connect Ghost to this container using the internal Docker network alias.
Creating the Ghost Webhook
Now that the cache purger container is running, Ghost needs to know where to send the webhook.
In Ghost, go to:
Settings → Advanced → Integrations
Here I created a new custom integration for the cache purger. Inside that integration, I added a webhook for the event:
Post published
Then I used this internal webhook URL:
http://ghost-cache-purger.internal:3001/purge
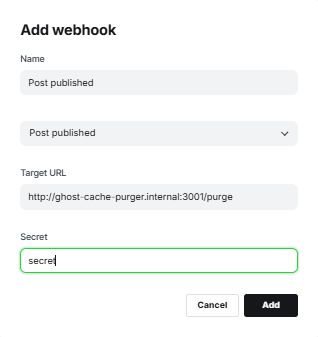
The hostname ghost-cache-purger.internal is the Docker network alias of the cache purger container.
I used this alias because Ghost validates webhook target URLs, and in my case the plain container name was not enough. Adding .internal made it pass validation.
The last part of the URL:
/purge
matches the PURGE_PATH value from my .env file.
The PURGE_PATH can be anything you like, as long as it matches the value in your .env file and the URL you enter in Ghost.
Ghost also gives the webhook a secret. I copied that value into my .env file:
GHOST_WEBHOOK_SECRET=your-ghost-webhook-secret
For my internal Docker network setup, the path does not have to be secret or public-friendly, because Ghost calls the cache purger inside the Docker network.
Still, the webhook secret is useful. Ghost signs the webhook request with this secret, and the cache purger uses it to verify the X-Ghost-Signature header before purging anything in Cloudflare.
Testing the Full Setup
With the container running and the Ghost webhook configured, it was time to test if everything worked.
You can test this by publishing a new post, but I found it easier to temporarily create an extra webhook for Post updated
That way, you can update an existing post and trigger the webhook without publishing a new article just for testing.
To watch what happens, follow the logs of the cache purger container:
docker logs -f ghost-cache-purger
Then update a post in Ghost.
If everything is configured correctly, you should see a successful request in the logs.

To confirm it even further, you can check the response headers of your homepage after the purge:
curl -I https://yourdomain.com/
After the cache has been purged, the first request should normally show a Cloudflare cache miss:
cf-cache-status: MISS
That means Cloudflare did not serve the old cached version and had to fetch a fresh one from your Ghost site.
After another request, it may become a cache hit again:
cf-cache-status: HIT
Final Thoughts
This setup solved the main caching problem I had with my self-hosted Ghost blog.
Cloudflare HTML caching made the site faster, but it also meant the homepage could stay stale after publishing a new post. By adding a small webhook-based cache purger, I can keep the performance benefits while still making sure new posts appear quickly.
For my setup, purging only the homepage is enough. That is the page that changes whenever I publish something, while the new post itself gets a new URL.
Your setup might be different, so it is worth thinking about which pages actually become stale when you publish or update content. For example, you might also want to purge tag pages, author pages or pagination pages later.
In this article, Ghost and the cache purger run on the same Docker network. If your Ghost instance is hosted somewhere else, the setup changes. The cache purger then needs to be reachable from Ghost, for example through a public HTTPS endpoint behind Nginx or another reverse proxy.
In that case, the webhook secret becomes even more important, because the endpoint is no longer only reachable inside your private Docker network.
For now, I kept the first version simple: Ghost sends a webhook, the cache purger verifies it, and Cloudflare purges the homepage cache automatically.
That is enough to remove one manual step from my publishing workflow.