5 Simple Cloudflare Settings to Boost Your Website Performance
If you’re self-hosting your website like I am, for example running a Ghost blog on a server and putting Cloudflare in front of it, you’ve probably noticed how many settings Cloudflare offers.
When I first started looking into it, I didn’t want to just flip random switches and hope for the best. I wanted to understand which settings actually make a difference, and which ones are safe to enable without breaking things like login pages, admin panels, or API requests.
In this article, I’ll walk you through a handful of simple Cloudflare settings that gave me the biggest performance improvements for the least amount of effort. These are all safe to apply, don’t require complex setups, and you can realistically configure everything in a single afternoon.
I’ll explain briefly what each setting does, when to use it, and what kind of impact you can expect.
📑 Table of Contents
- 1. Caching (The Biggest Performance Win)
- 2. HTTP/2 and HTTP/3
- 3. Early Hints
- 4. Tiered Cache
- 5. Always Online (Nice Extra)
- Final Thoughts
1. Caching (The Biggest Performance Win)
The biggest performance improvement I got from Cloudflare came from caching.
Even when you use Cloudflare, your website is not automatically fast. By default, most requests still go back to your server, which means your server is generating the page every time someone visits.
With caching, Cloudflare can serve that page directly from its edge network, without touching your server. This reduces latency and removes a large amount of unnecessary load from your VPS.
The important part is understanding what you can safely cache.
In general, static content like CSS, JavaScript, images and fonts is always safe. Public pages such as your homepage or blog posts are usually fine as well, as long as they are the same for every visitor.
Dynamic content is different. Anything related to admin panels, login pages, API requests or user-specific data should never be cached. Caching those can break functionality or even expose the wrong data to users.
Exactly what counts as static or dynamic depends on your setup, so it is worth taking a moment to look at your own application and identify which routes fall into each category. In my case, using Ghost, that meant treating routes like /ghost and /api as dynamic and excluding them from caching.
Cache rules
To set this up in Cloudflare, go to Caching -> Cache Rules -> Create rule.
I started by creating a rule to bypass caching for anything that should never be cached:

In my case, all dynamic content is served from routes that start with /ghost/, which is why I only needed to bypass that path. You should adjust this based on your own setup.
After that, I added a second rule to cache all public GET requests:
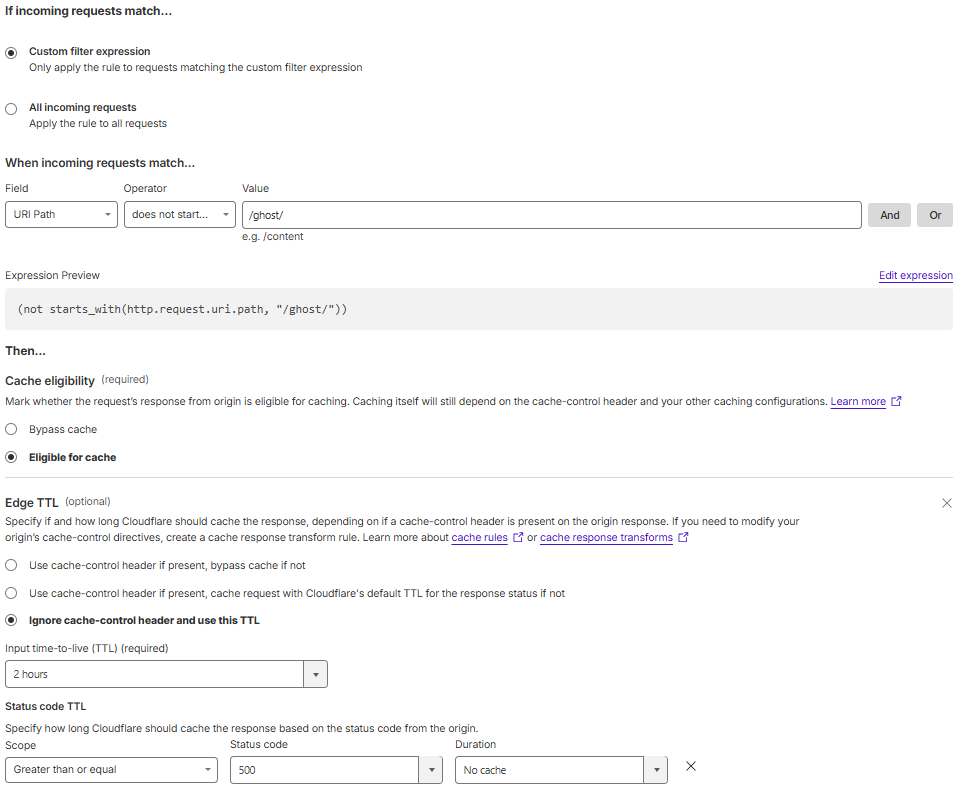
For this rule, I used the following settings:
- Cache eligibility: Eligible for cache
- Edge TTL: 10 minutes
- Ignore cache-control headers
- Do not cache responses with a status code of 500 or higher
This setup ensures that Cloudflare caches all public pages, while keeping admin and dynamic routes untouched.
Result
This one change had the biggest impact.
Before:
- TTFB: ~200 ms
- Every request hit my server
After:
- TTFB: ~20 ms
- Most requests are served directly from Cloudflare
You can verify this in DevTools by checking the cf-cache-status header. After enabling caching, it should show HIT instead of DYNAMIC.
Trade-off
There is one important downside to be aware of.
Because your HTML is cached, updates are not always visible immediately. For example, when you publish a new blog post, your homepage might still show the previous version until the cache expires.
In my case, I used a 10 minute TTL as a balance between performance and freshness.
If you need updates to appear instantly, you can purge the cache manually. In a follow-up article, I’ll show how to automate this using webhooks and the Cloudflare API, so your cache is automatically refreshed whenever you publish new content.
2. HTTP/2 and HTTP/3
Another easy win is making sure modern protocols are enabled.
Cloudflare supports HTTP/2 and HTTP/3, which improve how data is transferred between the browser and your website. This allows multiple requests to be handled more efficiently and can reduce latency, especially on slower or high-latency connections.
You can find these settings under Speed -> Settings -> Protocol Optimization.
In most cases, both HTTP/2 and HTTP/3 are already enabled by default. If not, you should turn them on. There is no real downside for a typical website.
3. Early Hints
Early Hints is a smaller optimization, but still worth enabling.
It allows Cloudflare to tell the browser which resources (like CSS or JavaScript) it will need before the full page response is ready. This means the browser can start loading those assets earlier.
You can find this under Speed -> Optimization -> Content Optimization.
In my case, this was already enabled. If it is not enabled for you, it is a safe setting to turn on and requires no additional configuration.
4. Tiered Cache
Tiered Cache is another setting that can reduce the load on your server, especially if you have visitors from different regions.
Normally, when a request is not cached, Cloudflare will go directly to your origin server to fetch the content. If multiple edge locations request the same uncached content, each of them can hit your server separately.
With Tiered Cache enabled, fewer requests reach your origin, because Cloudflare nodes share cached content with each other.
You can enable this under Caching -> Tiered Cache.
This does not directly reduce TTFB like HTML caching does, but it helps keep your server load lower and makes your setup more stable, especially as traffic increases.
5. Always Online (Nice Extra)
Always Online is not a performance feature, but it is a useful extra to be aware of.
If your origin server goes down, Cloudflare can serve an older version of your website instead of showing an error. In some cases, this fallback content comes from the Internet Archive.
You can enable this under Caching -> Configuration -> Always Online.
It is not something that will make your site faster, but it can improve the user experience during downtime. For a simple blog or static website, it is a nice safety net to have.
Final Thoughts
You don’t need to go through every single Cloudflare setting to get a fast website.
A few well-chosen changes can already make a big difference. In my case, focusing on caching alone reduced my TTFB from around 200 ms to roughly 20 ms, while also taking a lot of load off my server.
Most of the other improvements are either simple toggles or already handled by Cloudflare out of the box. For example, compression is typically configured automatically, so there is no need to overcomplicate things.
The key is to understand what you are enabling and to keep your setup simple. Start with the biggest wins, verify that everything works as expected, and only then consider more advanced optimizations.
And if you want to go one step further, you can automate cache purging so your content updates instantly without sacrificing performance. I will cover that in a follow-up article.